Queensgate is betting its portfolio of nanopositioning stages – core building blocks for cutting-edge scientific instrumentation used in applied optics, microscopy and metrology – will yield game-changing performance gains from a relentless strategy of incremental innovation

Enhanced spatial correction in multi-axis nanopositioning stages provided the original motivation – and, ultimately, the successful production outcome – for the latest project in the long-running R&D collaboration between Queensgate, a UK manufacturer of high-precision nanopositioning products, and scientists at the National Physical Laboratory (NPL), the UK’s National Metrology Institute.
With funding from Analysis for Innovators (A4I) – a programme run by Innovate UK, the UK’s innovation agency – the two partners undertook a “deep dive” into the nature and extent of parasitic (off-axis) motion errors in Queensgate’s multi-axis nanopositioning stages. Their granular investigation has yielded a practical correction and calibration methodology that will reinforce Queensgate’s end-to-end quality assurance (QA) across product design, development and manufacturing for its portfolio of piezo-driven nanopositioning stages (as well as enabling technologies such as piezo actuators, capacitive sensors, control electronics and software).
“Our collaboration with Queensgate has yielded reciprocal benefits over a wide range of joint R&D projects for the past decade or so,” explains Andrew Yacoot, principal scientist who leads NPL’s dimensional nanometrology programme and chairs the Working Group for Dimensional Nanometrology of the Consultative Committee for Length (one of ten Consultative Committees that oversee the SI units, the international standards of measurement). That win-win sees NPL address one of its broader missions: helping specialist technology companies to solve thorny industrial problems and, by extension, delivering transferable innovation, continuous product improvement and long-term commercial impacts. “At the same time,” adds Yacoot, “we get a direct line into Queensgate’s product development team to inform them of our unique, often non-standard, nanopositioning requirements for nanoscale science and metrology.”

If that’s the back-story, what of the project detail? For starters, spatial-error correction in nanopositioning stages represents a non-trivial exercise in applied measurement – owing, in large part, to the difficulty of capturing and analysing sufficient data points, also the complexities associated with coding the necessary error-correction algorithms. All of which provides the context for Queensgate’s latest tie-up with NPL, where Yacoot and colleagues exploit multi-axis interferometric instrumentation to support the laboratory’s ongoing R&D efforts in high-accuracy nanopositioning.
To this end, a dedicated NPL stage rig uses three orthogonally mounted, plane-mirror differential interferometers (designed by NPL) to measure the relative displacement between a mirror cube (mounted on a stage) and a set of reference mirrors. The interferometers are illuminated using light from stabilized helium-neon lasers that have been calibrated against NPL’s primary metre-realization laser to give traceable position measurement. To reduce thermal and acoustic effects, the entire set-up is also enclosed and mounted on a vibration isolation platform.
Made to measure
Using this experimental rig to characterize spatial errors (and inform the subsequent calibration process), the NPL project team put two Queensgate stages through their paces: the QGSP-XY-600-Z-600 (which has a 600 μm range along the x, y and z axes) and the QGNPS-XY-100D (which moves 100 μm in the x and y axes only). The latter is a high-performance stage that has been well characterized as part of a previous Queensgate/NPL collaboration on high-speed atomic force microscopy (AFM). Using a “known good” stage also allows the calibration methodology to be assessed in situations where the errors are smaller and thereby demonstrate the transferability of the error-correction techniques.
Zoom in and NPL’s measurement methodology is simple enough – albeit necessarily exhaustive. For each point in the stage’s volume of motion, the stage was commanded to move to a position and then allowed to settle for a specified time. “Closed-loop control ensures this position reflects the displacement reported by the stage’s capacitive sensors,” explains Yacoot. “The actual displacement is then collected from the NPL interferometers, in order to determine the spatial positioning error.”
Experimental insights
Operationally, the software for control of the stage rig and data collection was written by Edward Heaps, a member of Yacoot’s nanometrology team. His work was informed by previous studies showing that a scan of 11 points along each axis gives sufficient data for mapping spatial positioning errors (and, crucially, without an excessive timeframe for data acquisition).
For the 3D stage, Heaps captured a total of 1331 (11×11×11) data points at 40 μm (commanded) intervals, while for the 2D stage a total of 121 (11×11) points were captured at 10 μm (commanded) intervals. Furthermore, it was necessary to capture actual spatial positions for the commanded points for all axes moving in both directions – to assess repeatable errors caused by unavoidable hysteretic processes within the stage – while repeating the entire measurement cycle six times to quantify stochastic errors.

Innovation in optical interferometry: the secret of success in nanopositioning QA
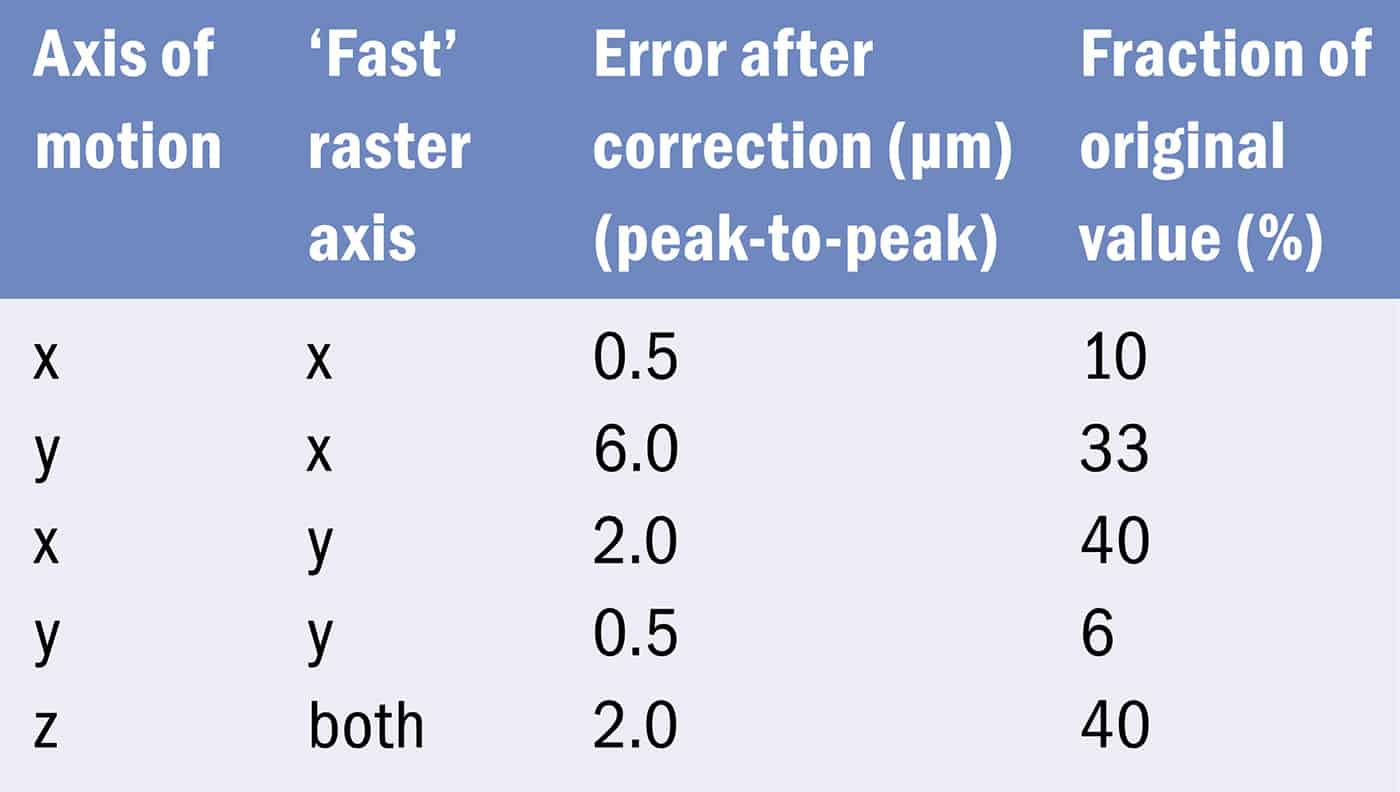
The resulting data set underpins a dedicated error-correction algorithm devised and optimized by Yacoot’s colleague Alistair Forbes, a mathematician and NPL Fellow. Following implementation of the algorithm within prototype stage firmware, the algorithm provides the basis for a robust calibration procedure that – evidenced by a repeat set of experimental measurements on the spatially corrected stages – yields a significant tightening of the positioning errors in the devices under study (see tables 1 and 2). Equally, the large multi-axis stage achieved performance improvements in line with the uncompensated shorter-range xy stage – opening up opportunities to deploy stages with longer travel ranges (600 µm x 600 μm) in high-precision applications like AFM, nanolithography and 3D nanoprinting.
“Right now, we are implementing the correction algorithm into full production-quality firmware while rolling out the calibration process within our assembly operations,” explains Sam Frost, production manager and site lead at Queensgate’s manufacturing facility in Paignton, UK. “There’s more work needed to standardize the new-look workflows, but we’ll be shipping the first commercial stages to benefit from NPL’s enhanced measurement and calibration methodology later on in the spring.”
Meanwhile, Queensgate’s product manager, Craig Goodman, is already laying the ground for the next joint project with NPL’s nanometrology team. With follow-on funding secured in the latest A4I round earlier this year, the partners will seek to build on the error-correction advances in linear nanopositioning stages, tailoring the multi-axis correction algorithm for application in Queensgate’s tip-tilt stages (which combine linear and angular motion along the x, y and z axes). “Tip-tilt stages are used in advanced silicon wafer processing and, owing to their construction, exhibit large cross-coupling errors between the two rotational axes,” explains Goodman. “It’s a complex proposition to quantify cross-talk between all the different actuators and sensors in a tip-tilt platform, let alone translate those insights into an optimized correction and calibration scheme.”


